Please welcome Heidi from Barefoot and Paleo back to the blog! If you missed her last guest post, be sure to check out How to Reuse 13 Things You’d Normally Throw Away. Alright, here she is with 18 Foods you Can Regrow from Kitchen Scraps!
I’m excited to be back at My Heart Beets today to expand on this post and talk about how you can regrow your own garden from food scraps you normally throw away.
According to the U.S. Environmental Protection Agency, 31 percent of the 430 billion pounds of food produced in the United States goes uneaten (source). In 2012, more than 36 million tons of food waste was generated and only 5 percent was diverted for composting (source). We can change the amount of waste produced dramatically – by regrowing our food scraps into edible plants. Not only is this practice environmentally friendly (keeping food waste out of landfills) but it is also makes economic sense for our wallets (serves as free food). It’s also a nice learning experience for kids. They get to learn about the process and watch their food grow.
For the best results, use organic fruits and vegetables along with organic compost soil. I would also suggest looking at a planting schedule for your area before starting your indoor or outdoor garden.
In addition to regrowing scraps, you can also save your vegetable seeds to grow your favorite vegetables. I’ll talk about this at the end of the post.
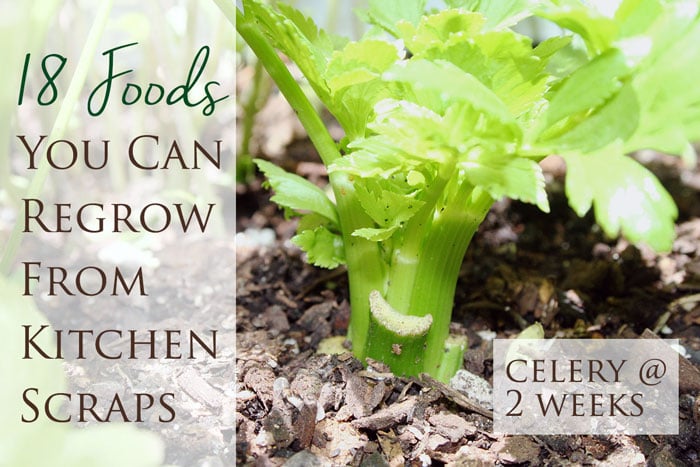
Celery, Bok Choy, Cabbage, & Romaine Lettuce
Step 1 – Cut the base off and put it bottom down in a bowl of shallow water (no more than ¼ inch paste the base). You need to add enough water for the whole base to be covered but do not saturate otherwise it will become soggy. Replace the water every few days.
Step 2 – In 1 week you should see regrowth coming up through the center. Once this happens you will want to transfer the vegetable to a container or plant it in the ground for further growth. Be sure to plant with only the new growth above the soil and water regularly.
Step 3 – In about 5 months the plant will be full grown and ready to harvest.
Mushrooms
Step 1 – Remove the head/cap of the mushroom.
Step 2 – Plant the mushrooms stalks in soil with only the top surface of it exposed.
Step 3 – Harvest when fully grown.
Green Onions, Leeks, Lemongrass, Fennel, & Scallions
Step 1 – Save the last 2 inches of the bottom of the plant (roots intact). Place in a cup of water (mason jars work wonderfully) with the roots down, leaving ½ inch of the top exposed. Then place on a sunny windowsill. Replace the water every day.
Step 2 – In 3 to 5 days you will see regrowth. For green onions, leeks, scallions, fennel, and scallions you can leave them in the cup of water. For lemongrass, plant in soil.
Step 3 – Harvest when fully grown, only cutting what you need for cooking while leaving the roots in the water. Repeat the steps with the same root ends. Harvest lemongrass once it becomes a foot tall. Cut off what you need without uprooting the plant.
Garlic
Step 1 – Plant a large garlic clove in a small container root-end down and 2 inches below the soil. Each clove will produce 1 bulb of garlic.
Step 2 – Place the container in a sunny windowsill where there is plenty of direct sunlight and keep the soil very moist.
Step 3 – Once the garlic is establish, cut back the new shoots so the plant has energy to produce more bulbs. Harvest when fully grown, about 5 months.
Tip – I tried to plant it in the ground once it started to regrow and it died immediately. I would recommend keeping garlic in a container so you can keep the soil very moist.
Note from Ashley: I wrote a post on how to grow garlic scapes in a shot glass that you might want to read!
Basil, Rosemary & Cilantro
Step 1 – Cut about 2 to 3 inches of new growth from an established basil plant, just above two leaf nodes.
Step 2 – Remove the bottom leaves and place in a cup of water – making sure the bottom is fully submerged in water. Place in a sunny windowsill and replace the water regularly.
Step 3 – In about 2 months you should see roots forming. Let the roots grow to at least 1 inch long then transfer into a container or in the ground. Water regularly to see a full plant grow.
Ginger
Step 1 – Soak a fresh chunk of ginger overnight. Be sure the ginger has a few growing buds (little bumps on the end of the ginger).
Step 2 – Plant the ginger in a container with the growth buds pointing up in moist soil and water every day until shoots appear then water regularly.
Step 3 – Harvest in 1 year or until the buds have grown into usable pieces.
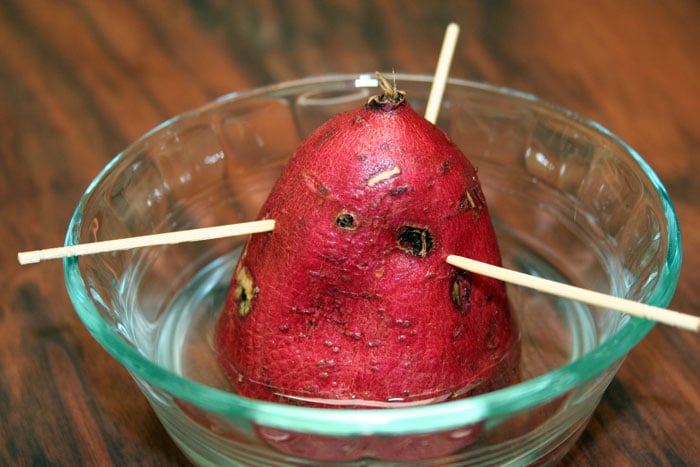
Sweet Potatoes & White Potatoes
Step 1 – Cut the potato in half and push 3 toothpicks midway around the potato. Place it cut side down in a glass of water, you want the potato to hang down in the water about ½ inch. Place on a sunny windowsill and replace water every few days.
Step 2 – In 2-3 weeks you will see potato plants (slips) growing out of the top. Once the splits reach 5-6 inches long, twist them off and put them in a cup of water to generate roots. Once the roots reach 1 inch long, plant them in loose, well-drained soil either in a container or in the ground. Water every day for a week then water regularly until harvested.
Step 3 – Harvest in 2 to 4 months or when the plant reaches 1 foot in height. A good indicator the potatoes are ready to harvest is when the tops of the plant die off or turn yellow. Carefully search the soil with your hands – don’t use anything sharp, it could puncture the potatoes.
Tip – Store sweet potatoes in a warm, dry place for 2 weeks. This is what gives them a sweet taste.
Carrot Plants
Step 1 – Place carrot tops bottom down on a plate.
Step 2 – Add water to the plate so there is ¼ inch of water past the base. Set near a sunny windowsill.
Step 3 – Once the carrot has regrown greens, transfer to an indoor container and water regularly.
Tip – You can use the carrot greens in a salad if you like. In addition to these 18 foods, you can also grow an Avocado Tree & a Pineapple Tree for decoration. While there’s a chance you may see fruit after a couple years using these methods, it really depends on your climate.
Pineapple Tree
Step 1 – Twist or cut the top off of a pineapple and remove the first few layers of leaves from the bottom.
Step 2 – Place the crown in a cup of water, bottom down, for 3 weeks or until you see roots.
Step 3 – Once roots form transfer it to a well draining house planter and keep moist.
Avocado Tree
Step 1 – Clean and dry your avocado nut.
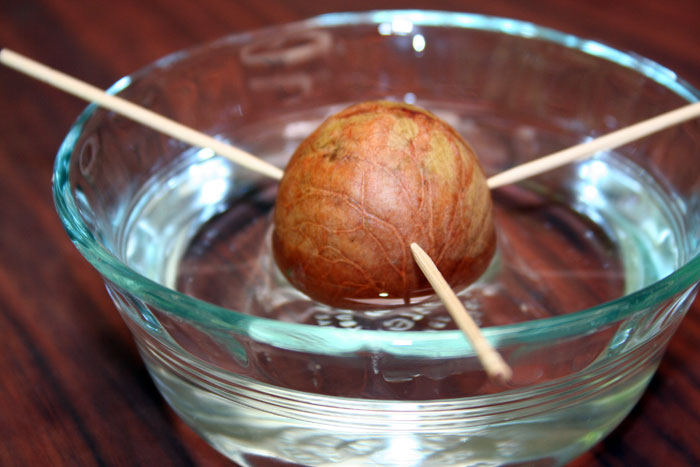
Step 2 – Push 3 toothpicks in the nut around the top. Place the nut bottom down in a glass of water. Make sure there is at least a ½ inch of water covering the bottom. Place on a sunny windowsill.
Step 3 – In about 3 weeks you will see the nut crack and roots form. Once this happens transfer to a medium planter and keep moist.
Tip – To determine the top from bottom: look for a small circular shaped dark brown spot on the side that is more flat, this is the bottom. The top will have more of a cone look. We never had issues growing avocado trees (for decoration) from our compost pile but this may not work depending on your climate. And finally, if you are growing your vegetables from seed, here’s how to plant them:
Vegetable Seeds
Step 1 – Save seeds from all your favorite vegetables, rinse with water, and set out to dry for a day or two.
Step 2 – Place each seed 1 inch below the soil and lightly cover with soil.
Step 3 – Once your seedlings are about 2 to 3 inches high transfer to larger containers or place in the ground. Water regularly.
Tip – Starting vegetable seedlings inside will give you the best results. Use small containers or paper egg cartons to start seedlings (you can put paper egg cartons right into the ground). I had success with bell pepper seeds, all types of squash, tomatoes, and cantaloupe. Have you tried to regrow food from kitchen scraps? We would love to hear about your experiences in the comments below!
Heidi Fiscus is an entrepreneur, real foodie, wife, and proud mama. In her spare time, she enjoys being outside barefoot, experimenting in the kitchen, learning new things, and traveling to new places.





Janet says
To answer two questions in comments here, Romaine lettuce is usually quite easy to regrow. Make sure it roots well, then transfer to soil carefully, keep lettuce moist and be patient for it to grow – it should sprout leaves – maybe we should let them sprout leaves as well for a few day at least before planting. My Romaine lettuce lettuce from the Nursery appreciates a part shady position (not too much sunshine, about half the day (they’re thriving). Concerning Beets (beetroot) you will find that Beets, Carrots and Turnips just grow the greens only which are edible……..different to Potatoes and Sweet Potatoes which will multiply with proper care because they grow from tubers which develop. Leaves on Cabbage and Nappa Cabbage (Chinese) wen regrown, will have a different formation and are still nutritious. Hope this helps. Enjoy!
Terri says
Hello!
I just came across this site. I was happy to read many of the comments.
I recently started growing some veggies from scraps. So far, I have leeks, carrots, celery, turnip and bok choy. The carrots are growing greens and now some roots. Can I plant them in soil now and will the actual root regrow? The leeks started to grow leaves really fast, then concentrated their energy on roots, and now are about to bloom. Should I cut off the leaves/buds and let them start over? Should I plant them in soil now? The turnips also started growing leaves quickly but now are about to bloom. Again, should I cut those off? Plant in soil? There aren’t any roots yet. Thanks for all the tips! Happy gardening!
Sherry says
Hi,
Did you get any response? I am also curious. Do we only get the greens or will there be actual carrots and beets growing as well. Thanks for your question.
Jennifer Nagy says
Can kohlrabi be regrown?
Heather says
I love this! I accidentally started lettuce by putting the bottom directly into very moist soil, as well as potatoes while clipping off the ‘eyes’ preparing for cooking. I was able to grow a bunch of beans while making 15 bean soup from the dried bean soup mix, just soaked the beans for several days in water. I have several pinapple plants using your method. I love doing these things, thank you so much for the information.
My Heart Beets says
That’s so great to hear! 🙂
Lollie2 says
First time I tried regrowing scraps indoors in water within 2 days I had celery and carrots sprouted. Any suggestions for romaine lettuce this is the one I want to regrow the most and so far three failed attempts?
Louise says
Surprised there’s not more here about growing beets.
Last year’s beets (from tiny beets) were giant. One was left in the pot. It now has a stalk that is about 3 ft tall, with nice healthy greens but still only a small beet as its base. It also has lots of green beaded “flowers”. Are these the seeds? It’s almost like certain types of bolting lettuce. My question is, can I bury parts of this stalk and hope to get more beets, or do I have to dry these flowers and get the beads to use as seeds, or do I have to have baby beets? I know I can eat the greens, but I want More BEETS!
Rob says
Hi there! i would like to know whether celeriac roots (not cellery) can be regrown and how. Thank you.
lulu says
Have you actually grown more mushrooms from planting the stems in soil? Are you talking about mushrooms from the grocery store?
Lady Luna says
Currently regrowing about 8 cloves garlic in a glass, 8 or 10 carrot tops, 2 bokchoy and have a cabbage head almost ready to start regrowing. My fave so far is leek. Am havin a great time regrowing from waste. Cant wait till I have my whole indoor “garden”. 🙂
My Heart Beets says
Awesome!
Susannah says
I’ve regrown scallions, basil and rosemary. I have to give the scallions away as there are way too many for me to eat. I am about to regrow bok choy and garlic to start.
My Heart Beets says
Awesome! 🙂
Jordan says
I’m growing garlic right now. Some of my shoots are already over a foot tall. It grows really fast, I read about cutting the tops down so the plant will use more of its energy on the bottom so that’s what I will do.
Felicita santos says
I’m new to your page. I just want to say how informative your tips are. I’ve always wanted to grow fruits herbs, and veggies but, don’t have the green thumb. What type of dirt should I get?? Should I buy some type of vitamins for them. I’m a diabetic and have kidney failure. Can you recommend what I should grow?????? Thank you in advance
Rice says
Hi,
I tried regrowing beet greens and bok choy. The beet leaves grow to the size of about 1.5 inch wide 3 inches long but then stop growing any larger. The bok choy leaves only grow to the size of the thumb. Both can be harvested once for consumption but will not regrow after the first harvest. I dug them out from soil and found no roots. Are they supposed to regrow forever or only once? Or am i doing it wrong?
Kelly says
How long did you wait? They have a maturation cycle of about 50-70 days when grown from seed. When grown from a “start” as we are talking about here, you’ve reset that clock to almost zero for the root zone. The plant has to grow new leaves to make food to be stored in the root (not all plants have root storage, but everything we call a root vegetable does) and that’s going to at least a month to really start to see that storage build up. What we eat is actually the beet plant’s warehouse of food that keeps it going during the dormant season and spring forth from early next spring. In terms of energy, the leaves are the solar panels and the swollen root that we eat is their battery!
Taniya D says
Thank you for all the tips, very useful indeed. Bless you 🙂
My Heart Beets says
Glad you like them 🙂
Margaret breighner says
I would like to do this with beets. However, if I cut off the base, the skin is broken on the beet and I was told you cannot cook beets with skin peeled as they will bleed. Comments?
Michelle says
I peel beets and cut them into pieces for roasting all the time. No problem 🙂
Kelly says
They bleed on you and everything else they touch, but cook just fine. Roasted root vegetables are a fabulous winter side dish. Peel rutabaga, turnips, beets and carrots. I like to cube them up about 3/4” to 1” sized pieces. Toss them in a big bowl with some olive oil, salt and pepper to evenly coat all sides, then spread One layer deep and preferably with a little breathing space between pieces, in a roasting pan or on a cookie sheet (lining with parchment paper makes cleanup a breeze). Bake at 450 degrees to get a crispy outside and tender inside. Some veg take longer than others due to density and moisture differences. Give the rutabagas about 40 mins, beets about 35 and turnips about 30, and carrots might only need 15 or 20. You can toss new veg on top of ones that were already roasting and stick them back in the oven if you are short on oven space. I made this last night and two cookie sheets worth of mixed veg served five adults as a side dish, with none left and lots of compliments.
lisa says
what about Kale?
Heidi @ Barefoot and Paleo says
I never tried to regrow kale, have you? I would love to hear how you did it so I can try it.
I feel like I need a special indoor green house to regrow all my kitchen scraps. ;o)
Thanks for adding to the list!
Lisa says
Never have…that is why I asked.
Barrie says
Thank you for a helpful article! It’s so funny because I was thinking about growing garlic and was wondering how to do that…now I have several plants I can grow this fall/winter! Thank you!
My Heart Beets says
Barrie, so glad this helps you! Let me know how your plants turn out 🙂
caryn says
Beet greens will grow from the cut off top of a beet. Treat like carrot tops.
My Heart Beets says
Good to know! Thanks, Caryn 🙂
Heidi @ Barefoot and Paleo says
Wonderful! Totally trying this since I have tons of beets right now.
Thanks for adding to the list!
Tamara Flick-Parker says
But will beets grow? Or just the greens?
Louise says
no one answered…so it’s a “no?”
Anna Filippo says
I’ll try and report back
Kelly says
If a plant can regenerate, it makes all of the parts it needs to live, meaning all the parts that are common to its species and variety. There has to be a root to support greens, and in turn the greens support the roots. I’m a Texas Master Gardener, and if you like the idea of growing things, you should check out the master gardener program in your area! I think every state and most counties have them.
EW says
Beets are a biennial. Think the answer is that they may produce seeds if planted outdoors. The seeds can be used for getting the roots.
Barbara says
Yes, they will, if you transplant them into some moist soil.
Rebecca Dorn says
Should I transplant a whole beet to get more beets, or just the top?